
so, i posted a while back the "towel thingy" (aka hooded towel, or towel ponch0) i made. and i promised a tutorial....finally here it is. sorry for the delay. it's so great that i am posting this at the END of summer, isn't it! i am sooooo behind. anyways.....here it is:
now, i made this pattern up, so if you have any questions, let me know. i will leave my measurements that fit my son who is a size 4T. you can adjust it to fit your child by trying on the hood at each step.
supplies needed:
1 hand towel
1 bath towel
1 yard double-fold bias tape
thread
step 1
• measure your child's head. (my child's was 22")
• measure from your child's shoulder, over his/her head, to the other shoulder and add 5". (my child was 22" plus 5" = 27")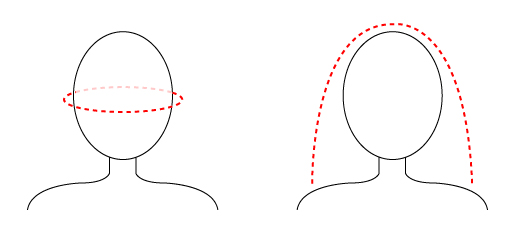
step 2
• cut hand towel. i cut mine to 22" by 27." use the hand towel's finished side as one of the sides. that will be the front edge of the hood. (I have been emailed a couple of times about hand towels not being big enough to cut to 22" by 27". it is okay if they are a little smaller. i made some smaller too. just make sure that the hood fits your child before you sew it to the towel.)
• plus, cut a 4 inch piece of bias tape and fold in half.
step 3
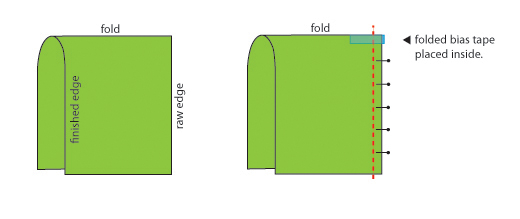
• fold your cut hand towel in half, right sides together. place folded piece of bias tape inside next to the top of fold on the raw edge side (see picture), and pin along raw edge.
• sew pinned side of towel together using ⅝" seam allowance. (see red dotted line).
step 4
• turn right side out.
• create a 3 inch tuck in the back of the hood (see picture).
• pin and sew (see red dotted line).
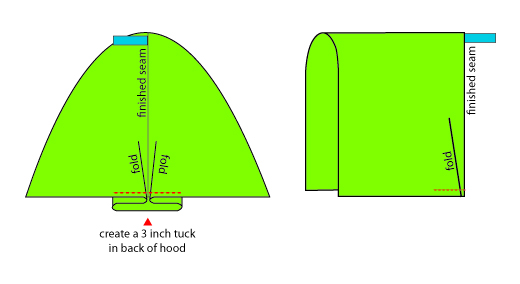
• measure hood on your child to make sure it is a good fit. you want to make sure that it is not to deep that it falls over your child eyes, but no too shallow that it slides off. and that the sides have are a couple inches below the top of their shoulders so that when sewn, the bath towel will rest on their shoulder's. (hope that makes sense???)
step 5
making hole in bath towel:
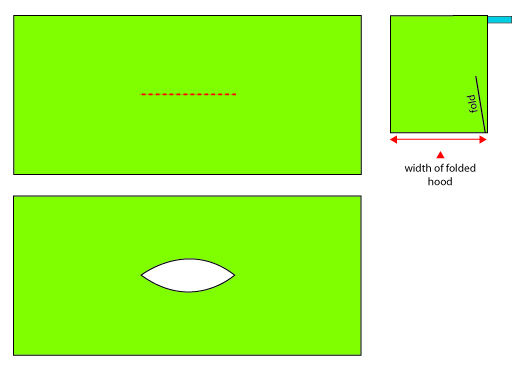
• measure the bottom of hood and divide that number by 2 and then add 1".
(mine was 18", so now it will be 9," plus 1" = 10")
• now, cut a 10" slit lengthwise into the middle of my bath towel (see picture).
i folded my towel in half, and cut a 5" straight cut on the fold, which it very easy to center my cut.
step 6
sewing hood to bath towel:
• right sides together, match up sewed seam on hood to the end of slit you made in the bath towel.
• pin each side of hood to each side of slit. sew hood to bath towel. (see red dotted line)
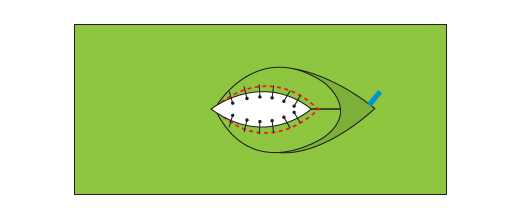
step 7
• turn your towel right side out. try it on your child's. it probably won't go over their head. cut the front slit on bath towel longer, until your towel can easily go on and off your child's head.
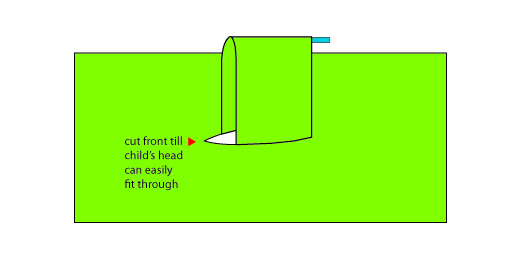
step 8
• to finish off the towel, sew bias tape around opening of the hood. use a zig zag stitch if you'd like.
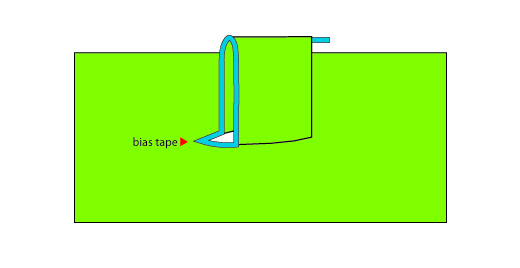

whala! you've got your hooded "towel thingy".
i have to say, that this has been such a nice thing to have this summer. it never falls off, soooooo much better than the other hooded towels that just wrap around you. i am so glad that i finally made it.
p.s. please let me know if any of my instructions are unclear. i made up this pattern, an am not an expert on creating a tutorial!


Donelle Anderson
SO AWESOME!!! Now if I could just squeeze in a moment to master my sewing skills. This could be a job for Grandma to do for her grandsons.
Beach Hendersons
Love it. I just finished making 2 of them. I had some issues but got it done. Thanks for responding to my email so promptly.
Thanks
Karla
It's me!....Jill
I am glad you got them done! Let me know what this issues were...maybe I can fix the tutorial. : )
Travis & Alisa
LOVE LOVE LOVE this tutorial....I need to make one for my kiddos before pool season starts! 🙂
We are featuring you today....on our Fabulous Finds Friday!
Alisa
Sweet Peas and Bumblebees
sweetpeasandbb.blogpost.com
Anonymous
My computer won't load the picture for the step that says "make a three inch tuck" for the hood. Can you clarify how to do that or post a new picture, if you have one? I am really excited to make these. I have been looking for a towel tutorial that is not a wrap around towel.
Thanks
Tonia
It's me!....Jill
It is kind of hard for me to explain the tuck in the back of the hood. I just put it there to make the hood more full so it stays on better. If you could email me, I could send you the picture. Or here is a link to the picture: http://lh4.ggpht.com/_J5WDg3KZoq8/THbSEJNtiRI/AAAAAAAABjA/QdcYtE0Zt7E/s800/Towel%20Thingy9.jpg
or email me: Jill (at) jillparkindesigns (dot) com
Nicole
Help! I'm making the towel right now. I'm confused about steps 5 and 6. If I measure the folded side, divide by 2 and add 1, then cut the slit, HOW do I line up the hood to the main towel in step 6? The hood is about 6 inches longer than the slit. Am I supposed to gather? I LOVE this idea, but I'm apparently using only half my brain cells today.
It's me!....Jill
Nicole, you can cut the slit longer if you want. I did not gather, but in step 4 I did make a tuck. Make sure the hood fits well, then adjust the slit in large towel to match. You will end up cutting the front slit bigger in order to fit the kiddies head in...step 7.
Hope this helps.
It's me!....Jill
Basically, you want the hood to be centered in the middle of the towel. Then you can cut the slit in front longer to allow your child's head to slip in and out.
Vanessa@Designs By Sessa
Cuuute! I have a cute little hooded towel tute on my blog, but I like the robe type idea, too! Very adorable!
Liga
Thanks for the great turorial! Finally I found courage and time for this project. Although I made some changes to it (I made the hole in the oposite direction), the result is just as I imagined. Thanks again and best luck!
Catherine
Found this link in the search results on Pinterest. I found your tutorial very easy to follow and was able to make adjustments for my child to have a proper fit. Made a few other additions/adjustments and they(made two) are adorable. Thank you!
Susan Schremser
I just made one up and am disappointed. When you make a slit in the center that is positioned vertically, the finished poncho wears with the front longer than the back. Also the pleat in the back of the hood makes for a lumpy area in the back of the hood. It is a cute idea, but felt uncomfortable on. I am going to try another pattern off of Pinterest that instructs a horizontal cut for the hood insert. Just an FYI.
Tracy Lynn
I made mine with the slit horizontally by accident and I skipped the pleat. In other words, I just used this tutorial for the basic idea. It sits flat across my daughter's shoulders, so maybe that's the switch that would work for you.
Angela Wolf
How do you get 10” in step 5. If you started with 22” and that ends up being the bottom of the hood aren’t you close to 40” divide by 2 and and an inch??? What am I missing.
Jill
The hood started as 22" across. Then I added the pleat in step 4, which made it 18". Step 5 is all about the hat part of the hoody towel. Not the bottom of the entire thing.